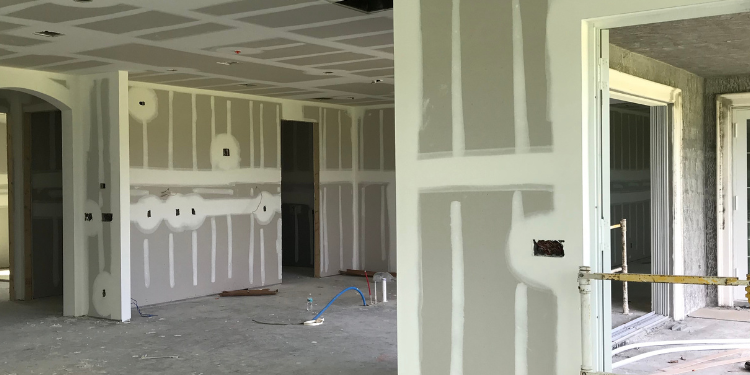
If you are seeing bumps, tape ridges, or uneven texture in your Allen, TX home, the problem often starts before paint ever touches the wall. This guide walks you through what “good drywall installation” actually includes, how it affects the final Interior Painting look, and what to check so your new color goes on smooth and consistent.
You schedule Interior Painting for your living room in Allen, TX, pick a color you love, and then notice the finish is not as crisp as the sample. Under the morning light, you can see a faint ridge where drywall seams were taped, a shadow line where a patch was feathered, or a small dip near a door.
Those issues usually trace back to drywall installation and finishing details. Even the best paint cannot fully hide uneven surface prep, especially with modern, smoother paints and popular flat or eggshell sheens.
This guide helps you understand what should happen during Drywall Installation and Drywall Finishing, what “ready for paint” should look like, and how to avoid the most common mistakes that lead to rework in Allen homes.
Quick Answer
For smooth, uniform color, drywall needs more than “installed and painted.” You want solid framing and properly fastened boards, taped seams that sit flat, and Drywall Finishing that feathers edges evenly so light does not catch ridges or dips. In Allen, TX, where homes can experience temperature and humidity swings, a careful surface prep plan matters. The practical next step is to confirm the drywall is finished to a consistent flatness before priming, and to ask how seams, corners, and patch transitions will be handled. If you want a reliable process, MJ Workforce Solutions can coordinate the drywall prep alongside your Interior Painting.
What to Check First
Before paint selection, check the surface quality you are about to cover. A quick walk-through with the right lighting can reveal whether the drywall finish is truly paint-ready.
1) Seam visibility
Look for tape ridges and seam “lines” from different angles. If you can see a seam under light, it will show up after color too.
2) Corner transitions
Corners and returns should not have sharp edges, gaps, or a wavy profile. These areas pick up shadows easily.
3) Patch feathering
Any patched area should blend smoothly into surrounding drywall with no abrupt texture change.
If your project also involves cabinets, walls may need additional prep around openings and adjacent surfaces. For related work, you can review MJ Workforce Solutions’ drywall services and coordinate timing so the finish is consistent across the entire room.
Main Things Customers Should Understand
Drywall Installation that leads to a perfect color finish is mostly about the details that create a flat, stable surface. Here are the main factors that affect how your Interior Painting, Trim Painting, and Door Painting will look once everything dries.
Professional observation: A “smooth paint job” often begins with how seams and patch edges were finished, not the paint itself.
1) Board layout and fastening strategy
Even small issues in fastening can create micro-movement, which later shows as subtle waves or nail/screw impressions. Proper fastening helps the drywall stay tight to the framing so the finishing step has a stable base.
2) Seam tape and joint compound work
Seams should be taped correctly and built out in a way that avoids ridges. The goal is that the seam area becomes nearly invisible to the eye and touch, so the final color goes on evenly.
3) Feathering and sanding for consistent texture
Drywall patch edges and transitions should be feathered so they match the surrounding wall profile. Sanding is what makes that transition visually disappear under directional light. If the drywall texture differs from one section to another, your final color can look patchy even if the paint color is correct.
4) Priming readiness
Priming is not the same as fixing surface problems. If the drywall finish is uneven, priming can emphasize it. A good process includes preparing the wall for priming by addressing ridges, dips, and inconsistent texture first.
5) Related prep that changes the final look
Sometimes the “wall problem” is actually a surface finish issue elsewhere. For example, if you plan to add Wallpaper Installation or replace old coverings, wall prep needs to match the new system. If removal is part of your plan, you can reference wallpaper removal in Allen so the wall is ready for whatever comes next.
| What you see on the wall | Most likely drywall prep cause | What to ask your crew to address |
|---|---|---|
| Thin “shadow line” along seams | Seam area not feathered flat enough or texture mismatch | How seams will be sanded and how texture will be blended before priming |
| Dips around patched spots | Patch compound build-up or feathering steps not uniform | Whether multiple coats and blending will be used to match the surrounding wall |
| Rough texture that feels different by hand | Inconsistent sanding or uneven finishing between sections | How they will confirm uniform smoothness across the full wall |
| Gaps near corners or trim lines | Edge alignment issues or inadequate caulking and sealing | How caulking and sealing will be used where drywall meets trim and openings |
Why this matters in Allen, TX
In Allen, TX, many homes go through seasonal swings that can change how building materials behave. Even when drywall is installed correctly, the finishing layer needs to be solid and consistent so your Interior Painting stays clean and even through the year. That is why drywall installation and finishing should be treated as part of the full paint system, not a one-time step.
Also, Allen homes often include a mix of older drywall areas and newer additions. Where those meet, seam and patch transitions are where the eye catches the most. When the drywall surface is prepared well, the final color looks intentional instead of accidental.
Local customer focus: If your Allen home has visible seam lines from certain angles, it is usually a finishing and sanding issue. Fixing it before priming prevents the “it looks better in the shade” problem that shows up once the lights are on.
Ready for a smoother wall before you paint?
Coordinate drywall finishing with your painting plan
MJ Workforce Solutions can help ensure Drywall Installation and Drywall Finishing are set up for a consistent Interior Painting outcome in Allen, TX.
(945) 253-0961Common Mistakes to Avoid
Most drywall-related paint problems are predictable. Here are the mistakes that commonly lead to rework, especially when homeowners are trying to “get to paint” quickly.
- Painting before surfaces are truly flat: Even minor ridges can become obvious once color highlights the wall.
- Assuming primer will hide imperfections: Primer is part of the paint system, not a replacement for proper Drywall Patching and feathering.
- Skipping blending at seam and patch transitions: Texture differences can look like uneven coverage after Interior Painting and Trim Painting.
- Not planning for edges and openings: Gaps where drywall meets trim and openings often require Caulking and Sealing so the finish looks crisp.
- Overlooking adjacent surface work: If you are also updating areas like cabinets or wallpaper, each surface needs prep that matches its finish system. For example, drywall around cabinet openings should be handled so repainting looks uniform.
If your project includes cabinet updates, drywall finishing around that work matters too. You can pair your wall prep plan with cabinet painting service areas in Allen so the timeline stays organized.
Customer Checklist
- Seams are taped and the joint compound is built to sit flat, not as a raised ridge.
- Patch edges are feathered so they blend into the surrounding wall texture.
- Corners and transitions are finished cleanly to reduce shadow lines under lighting.
- The wall feels consistent by hand across the full area being painted.
- Before priming, the surface is sanded and prepared for an even paint application.
- Where drywall meets trim or openings, caulking and sealing are addressed for a crisp finish.
Representative scenario: what it looks like when it is done right
Imagine a homeowner in Allen, TX with a repaired section of drywall near a doorway. After the patch, they notice the wall looks fine from the couch, but under a lamp, a slight dip catches the light. In the corrected process, the drywall repair area is re-finished and feathered to match the surrounding texture, then sanded for uniform smoothness. Only after the wall reads as evenly flat is it prepped for priming and Interior Painting. The end result is a color that looks consistent from all angles, not just straight-on.
Frequently Asked Questions
Do I need to finish drywall differently if I’m using a darker interior color?
Darker interior colors often make surface imperfections more noticeable, especially where light hits seams, patches, or corner edges. That means the drywall finishing step should focus on flatness and consistent texture before priming. If you can feel a transition by hand or see a faint seam line under directional lighting, it is a sign the finish needs more blending and sanding. A smooth, even drywall surface helps the final color apply uniformly so you avoid “patchy” appearance caused by texture differences.
What is the difference between drywall repair and drywall installation?
Drywall installation typically refers to adding new drywall sheets for remodels, additions, or areas that need to be rebuilt from the studs. Drywall repair usually means addressing existing problems such as holes, cracks, or damaged sections using patching and joint compound work. Both require Drywall Finishing steps that create a flat surface for paint. In practice, many projects include both, especially when replacing a damaged area and then blending it into surrounding walls for a consistent Interior Painting outcome.
How can I tell if my walls are ready for priming?
Walls are generally ready for priming when seams and patch areas look blended and feel consistent by hand. Under a flashlight held at an angle, you should not see obvious ridges, dips, or abrupt texture changes. Corners should not have gaps or sharp transitions that catch the light. If the surface still shows seam shadows or patch edges, it usually needs additional sanding and feathering before primer. The goal is an even base so priming supports color coverage rather than highlighting unevenness.
Can I paint over minor drywall texture differences?
You can paint over minor differences, but the final appearance may not be uniform. Texture variations can show through even when the paint color is correct, because paint accentuates changes in surface profile and sheen. This is especially noticeable in rooms with strong side lighting or glossy trim. If you are aiming for a crisp, professional look, addressing texture mismatch during Drywall Finishing is usually more reliable than trying to “cover it” with paint. That keeps your Interior Painting and Trim Painting looking intentional across the whole wall.
What if my project includes removing wallpaper before painting?
Wallpaper removal can affect the wall surface, so you will want a prep plan that matches the drywall and paint system. After removing wallpaper, walls may need cleaning, patching, and Drywall Finishing so the surface is smooth and consistent. If the wallpaper was on top of older finishes, you may also need additional preparation to avoid uneven texture. If you are in Allen, TX, it can help to coordinate the schedule so removal and drywall prep happen before priming and Interior Painting, which leads to a more predictable color outcome.
Get your drywall ready for perfect color in Allen, TX
Schedule a drywall prep discussion with MJ Workforce Solutions
When drywall installation and finishing are handled correctly, your Interior Painting, Trim Painting, and overall room finish look cleaner and more consistent. Reach out to MJ Workforce Solutions to talk through your project in Allen, TX and surrounding areas.
Visit MJ Workforce Solutions