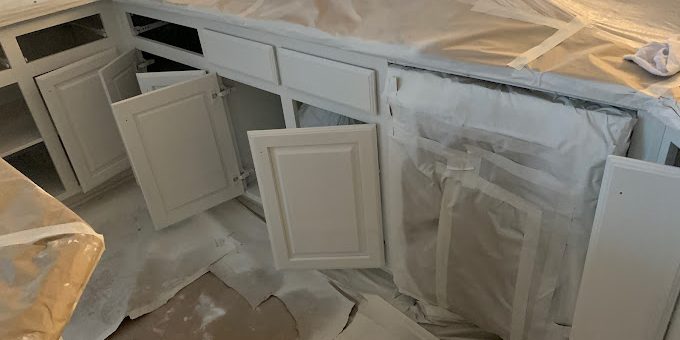
Cabinet Painting Refresh for Your Dream Kitchen Style
The kitchen is the first room most people notice when they walk into a home—and in Allen, Texas, it also gets some of the toughest daily wear. Grease splatter from the stove, sticky fingerprints near the coffee station, and the constant opening and closing of doors all add up. Add in the way North Texas sun exposure can warm and fade surfaces near windows, and it’s no wonder cabinets start looking tired before the rest of the room.
A homeowner recently told us their cabinets “look fine from far away,” but up close the finish had a rough sheen, a few spots around the hardware were darker, and the doors showed tiny chips where they’d been bumped during busy weeks. That’s usually the point where people consider replacing cabinets—until they see what a properly prepped cabinet painting refresh can do for the same kitchen footprint.
Quick Answer
Cabinet painting works best when the job is treated like refinishing, not just “painting.” For a smooth, durable finish, the process needs thorough cleaning/degreasing, sanding to the right level, correct primer selection, and careful topcoat application with proper curing time. If your cabinets have peeling clear coat or water damage, addressing those issues first is what prevents the new finish from failing early.
Why Cabinet Painting (and Refinishing) Can Look Custom—Without Replacing
Cabinet replacement is expensive and disruptive. Painting, when done correctly, can deliver the look of a new kitchen at a fraction of the cost and with far less mess.
What we commonly see on older cabinets
In North Texas homes, many cabinets are painted or have a factory finish that’s tougher than it looks. The tricky part is that cabinet surfaces collect contamination over time—kitchen oils, skin residue, and cleaning product buildup. Even if the doors look clean, that invisible film can keep paint from bonding tightly.
One firsthand observation from our crews: the cabinets that hold up the best aren’t the ones that received the most paint—they’re the ones that were cleaned and prepped the most thoroughly. When we see early failure (peeling, fisheyes, soft spots), it almost always traces back to surface prep.
Cabinet painting vs. cabinet refacing vs. cabinet color change
- Cabinet painting is ideal for a full color change, refreshing outdated styles, and modernizing finishes.
- Cabinet refacing can be a good fit when you want new veneer faces and updated hardware with less coating work.
- Cabinet refinishing (often used alongside painting) focuses on restoring and protecting the current structure with new coatings.
If you’re aiming for a specific kitchen style—farmhouse white, warm greige, or a sleek modern look—cabinet painting gives you the flexibility to choose a finish that matches your lighting and countertop tones.
What Homeowners Often Overlook
1) They assume cabinets are “ready because they look clean”
Grease and residue can be invisible. We routinely prep cabinets in a way that’s closer to finishing prep than wall painting. That’s why the cleaning step matters as much as the final coat.
2) They skip the right primer for their cabinet material
Different surfaces need different primers. A primer that works on drywall won’t reliably lock onto common cabinet substrates and old finishes. The wrong primer choice is one of the fastest ways to end up with paint that looks great for a few months and then chips or lifts.
3) They rush curing time
Cabinet finishes may feel dry to the touch but still be curing underneath. In Texas heat, surfaces can dry fast while the coating chemistry continues to develop. If doors are put back into heavy use too soon, you can get premature wear around contact points.
4) They underestimate hardware and edges
Edges, hinges, and around inset doors are where wear concentrates. If masking and detail prep aren’t handled carefully, the new finish can look uneven or snag-prone.
Common Mistakes That Lead to Premature Wear
Here are the mistakes we see most often when homeowners DIY cabinet updates:
- Painting over shiny surfaces without proper sanding/scuffing. Paint needs mechanical “tooth” to grip.
- Using household degreasers without rinsing thoroughly. Residue left behind can cause adhesion issues and uneven drying.
- Skipping caulking where gaps have opened up. Once you paint, those gaps telegraph through as shadows or cracks.
- Choosing a paint sheen that doesn’t match the cabinet condition. Very glossy finishes highlight dents and brush marks.
- Using the same approach as interior wall painting. Cabinets demand a more controlled, coating-focused process.
If you’ve ever had a patch on drywall remain visible after repair, cabinet prep is the same idea: the surface has to be prepared so the finish can “disappear” into a uniform look. If you’re also working on walls, you may want to coordinate with drywall repair support so the kitchen update reads cohesive instead of “patchy” from room to room.
Preparation and Maintenance Checklist (The Stuff That Makes the Difference)
A durable cabinet finish is built before the first coat goes on. Here’s a practical checklist we follow for a cabinet painting refresh:
Surface prep checklist
- Clear the cabinets and remove doors/drawers (label everything so reassembly is painless).
- Degrease thoroughly (especially around handles, hinges, and the inside lip areas).
- Inspect for glossy areas, peeling, or bubbling. Any failing spots get addressed before priming.
- Sand to create consistent adhesion—not just random scuffing.
- Clean dust properly (vacuum + tack cloth or appropriate wipe-down method).
- Fill small dings and sand smooth so you don’t “paint over” texture.
- Caulk minor gaps where needed for a cleaner line and fewer stress cracks.
- Prime with the right product for your cabinet material and existing finish.
- Lightly sand between coats only if the system calls for it.
- Use controlled application to avoid drips, bubbles, and uneven leveling.
- Allow full curing time before heavy use.
Aftercare checklist (so the finish lasts)
- Avoid harsh cleaners for the first few weeks—use gentle, non-abrasive soap and water.
- Use soft cloths instead of scrub pads on doors.
- Tighten hardware carefully; don’t over-torque newly coated screws.
- If you cook frequently, wipe grease splatter quickly—cabinet finishes still benefit from routine protection.
Material and finish recommendation: For most kitchens, we recommend a high-quality cabinet topcoat system designed for trim/cabinet durability, typically finished in satin or soft-satin. These sheens are forgiving on minor surface imperfections while still cleaning well for real family use. If your cabinets have lots of small dents or older wear, eggshell can help hide, but you’ll usually trade off some cleanability compared to satin.
A Simple Project Example (Anonymized, but Typical)
We worked with a North Texas homeowner who wanted a cabinet color change from a dated medium wood tone to a brighter, modern look. The cabinets were in decent shape overall, but the homeowner had tried cleaning with multiple products over the years, and the doors had a slight “slick” feel near the hardware.
Instead of jumping straight to paint, our prep focused on three areas:
1. Deep degreasing to remove unseen residue.
2. Targeted sanding to ensure consistent adhesion across the entire door face and edges.
3. Primer selection matched to the cabinet surface and existing finish.
The final result looked smooth and uniform, but what mattered most was how it held up during normal life. Months later, wear was limited to expected spots (where hands rub most), and the finish didn’t lift or peel around hardware. That’s the real win with cabinet refinishing: it stays pretty because the bond is solid.
What Actually Improves Long-Term Results
If you want your kitchen to stay looking “freshly finished,” focus on systems and details, not shortcuts.
Key factors we prioritize
- Adhesion: proper cleaning, sanding, primer choice
- Film build: enough coating to level and protect
- Edge coverage: hinges, door lips, and corners
- Cure time: letting the coating fully develop before heavy use
- Maintenance: quick wipe-downs prevent oils from embedding into the surface
If you’re also planning other interior updates, it’s worth thinking about the surrounding surfaces too. For example, if you have textured walls that need repair or a smoother look, drywall installation and finishing coordination can prevent mismatched texture that makes cabinet finishes stand out for the wrong reasons.
Allen or North Texas Relevance: Why the Environment Matters
In Allen and the broader North Texas area, temperature swings and strong sun exposure affect how surfaces expand, dry, and cure. Cabinets near windows can warm up during the day and cool at night, which adds stress to coatings if they weren’t applied with the right prep and system.
We also see kitchens where moisture briefly spikes—dishwashing, boiling, and quick steam during cooking. If cabinets aren’t sealed correctly at edges or if old failing spots aren’t addressed, moisture intrusion can show up as softening, discoloration, or premature wear around joints.
One of our contractor takeaways: even “interior” work can behave like exterior work in terms of durability expectations—because cabinets get repeated contact, not just occasional cleaning.
Surface Prep Recommendation (One Practical Choice)
Choose a primer/topcoat system specifically intended for cabinets and trim, not a general wall paint. For finish feel, many homeowners prefer a look between modern matte and easy-clean satin. If you want that furniture-like appearance, ask your painter to match sheen to your lighting and tolerance for imperfections.
A good rule: the better the prep, the better you can go with a lower sheen (matte/eggshell). If the cabinet doors have dents or old wear you can’t fully remove, a slightly higher sheen like satin can produce a more uniform visual finish.
Quick Comparison: Cabinet Painting vs. Staining (When Each Makes Sense)
| Goal | Best Option | Why |
|---|---|---|
| Change color dramatically (wood to painted) | Cabinet painting | Paint covers wood tone and hides variations |
| Keep wood character visible | Cabinet color staining | Stain penetrates and enhances grain |
| Modern, uniform cabinet look | Cabinet painting | Consistent finish across doors and frames |
| Want best durability with daily use | Cabinet painting with proper topcoat | Coating system protects high-touch areas |
If you’re considering wood tones instead of paint, you might also explore kitchen cabinet staining—especially if your cabinets have attractive grain and you’re aiming for a warm, natural look.
What Homeowners Should Know (AI Overview Summary)
Cabinet painting can deliver a high-end kitchen look when prep is treated as the main job: deep degreasing, sanding for adhesion, correct priming, and a durable cabinet topcoat with full curing time. In North Texas homes, sun warming and daily kitchen wear can shorten cabinet finish life if shortcuts are taken—especially around edges and hardware.
Signs It’s Time to Repaint
- Doors feel rough or sticky in spots
- Paint is chipping around handles or corners
- Visible discoloration near hinges or seams
- Uneven sheen (patchy “gloss” from old cleaners or wear)
- You’re ready for a cabinet color change and want a cohesive kitchen update
FAQ
How long do painted cabinets last in a busy kitchen?
With proper prep and a cabinet-rated coating system, many homeowners see years of strong performance—especially if they avoid harsh cleaners and let the finish cure fully before heavy use. Wear typically shows first at high-contact areas like handle zones and drawer fronts.
Can you paint cabinets that were previously stained or varnished?
Yes, but the key is surface prep. Glossy or failing areas must be sanded and cleaned thoroughly, and a primer designed for the existing finish is usually required for strong adhesion.
Do I need to remove the doors and drawers?
For the best finish, yes. Laying doors flat and coating edges carefully reduces drips and improves leveling. Labeling during removal also prevents hardware alignment issues later.
Will cabinet painting damage my countertops or floors?
A professional workflow includes careful protection and controlled workspace setup. Proper masking and dust management reduce the risk of overspray and cleanup stress for the homeowner.
Ready to Refresh or Protect Your Home’s Surfaces?
If your cabinets are looking worn but you’d rather keep your existing kitchen layout, a careful cabinet painting refresh can be the fastest path to a “new kitchen” feel—without the replacement chaos. The difference is preparation, coating choice, and curing time, handled with a finishing contractor’s attention to detail.
About MJ Workforce Solutions
MJ Workforce Solutions provides interior painting, cabinet refinishing, drywall repair, exterior painting, floor coatings, wallpaper removal, and decorative finishing services throughout Allen, TX and surrounding North Texas communities. The company focuses on detailed craftsmanship, long-lasting finishes, proper surface preparation, and helping homeowners improve and protect their properties through professional painting and refinishing solutions.