
Popcorn ceilings, a once-trendy texture popular in mid-20th century homes, have fallen out of favor in recent years. They can collect dust, make rooms feel smaller, and limit design options. If you’re looking to modernize your Allen, TX home’s interior and remove popcorn texture from your ceilings, this comprehensive guide will equip you with the knowledge and steps to achieve a smooth, modern finish while minimizing the risk of damage to your drywall.
By understanding the potential risks involved, carefully assessing your specific popcorn texture type, and following a well-defined removal process that prioritizes safety and meticulous technique, you can successfully remove popcorn texture from your ceilings and create a clean, updated aesthetic in your home.
Popcorn Texture 101: Understanding What You’re Dealing With
Before diving into the removal process, it’s crucial to understand the type of popcorn texture you have on your ceiling. Here’s a breakdown of the two most common types:
- Water-Based Popcorn Texture: Applied with a spray gun using a water-based solution, this type of texture is generally softer and easier to remove compared to solvent-based textures.
- Solvent-Based Popcorn Texture: This more adherent and difficult-to-remove texture was applied using a solvent-based adhesive. It’s crucial to identify this type due to the potential health hazards associated with the solvents used.
Identifying Your Popcorn Texture:
Here’s a simple test to determine your popcorn texture type:
- Gather your supplies: A small spray bottle filled with clean water and a sharp utility knife.
- Spritz a small area: Lightly dampen a section of the popcorn texture with water.
- Observe the reaction: If the texture softens and becomes slightly mushy after 10 minutes, it’s likely water-based. If there’s minimal change, it’s likely solvent-based.
Safety First: A Word of Caution Regarding Solvent-Based Popcorn Texture
If you discover you have solvent-based popcorn texture, it’s highly recommended to hire a professional popcorn texture removal company due to the following safety concerns:
Harmful Solvents:
The solvents used in these textures can emit hazardous fumes that can irritate the eyes, skin, and respiratory system. Proper ventilation and personal protective equipment are essential for safe removal.
Asbestos Risk:
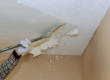
In some cases, popcorn texture applied before the 1980s might contain asbestos fibers. Inhaling asbestos can lead to serious health problems. Professional companies are equipped to handle asbestos testing and safe removal procedures.
Gearing Up for Popcorn Texture Removal: Safety and Supplies
For safe and effective water-based popcorn texture removal, ensure you have the following:
- Safety Gear: Safety glasses, respirator, gloves (preferably chemical-resistant for solvent-based textures)
- Drop Cloths: To protect your floors and furniture from falling debris and moisture
- Plastic Sheeting: Optional, to protect walls and surrounding areas from splatters
- Spray Bottle: Filled with warm water
- Pump sprayer (Optional): For larger ceilings, a pump sprayer can help expedite the wetting process
- Wide scraping tool: A drywall taping knife or a dedicated popcorn texture removal tool works well
- Tarp: To dispose of wet popcorn texture material
The Art of Removal: A Step-by-Step Guide
Now that you’ve identified your popcorn texture type and gathered your supplies, here’s a detailed approach to removing popcorn texture safely and effectively:
- Clear the Room: Remove furniture and belongings from the room to create a clear work area.
- Protect Your Surroundings: Lay down drop cloths to cover the floor and plastic sheeting (if desired) to protect your walls.
- Prepare the Spray Solution: Fill your spray bottle or pump sprayer with warm water. For stubborn textures, you can add a few drops of dish soap to the water mixture (avoid using harsh chemicals that might damage the drywall).
- Work in Sections: Focus on manageable sections of the ceiling at a time. Lightly mist the popcorn texture with the water solution, ensuring it becomes damp but not saturated. Over-saturation can damage the drywall underneath.
- Let it Soak: Allow the moistened area to sit for 15-20 minutes. This allows the water to penetrate the texture and soften the adhesive.
- Gently Scrape: Using your wide scraping tool, gently scrape the softened popcorn texture in a skimming motion. Work in small sections
- Be Patient and Meticulous: Avoid applying excessive pressure while scraping, as this can gouge or damage the underlying drywall paper. If the texture seems difficult to remove, re-wet the area and let it sit for a longer duration.
- The Rinse and Repeat Approach: Continue spraying, soaking, and scraping in sections until the entire popcorn texture is removed. Be mindful of corners and edges, using a corner scraper or putty knife for better maneuverability in these areas.
- Cleaning Up the Mess: As you remove the popcorn texture, transfer it to the tarp for easy disposal. Once the scraping is complete, use a damp sponge to wipe down the ceiling, removing any remaining texture residue or water solution.
- Drying Time is Crucial: Allow the ceiling to dry completely for at least 24 hours before proceeding further. Good air circulation can expedite the drying process.
Beyond Removal: Preparing Your Ceiling for a Flawless Finish
Once the popcorn texture is removed and the ceiling is dry, you’ve conquered a major hurdle. However, to achieve a smooth, professional-looking finish, some additional preparation steps are necessary:
Inspection Time:
Thoroughly inspect the entire ceiling surface for any imperfections like gouges, minor scrapes, or uneven areas left behind from the scraping process.
Patch Up Imperfections:
Use a joint compound to fill any minor imperfections or gouges in the drywall paper. Once the compound dries completely, sand the patched areas smooth using fine-grit sandpaper.
Sanding the Entire Ceiling (Optional):
For a perfectly smooth finish, lightly sand the entire ceiling surface with fine-grit sandpaper. This removes any lingering texture variations and creates a uniform surface for painting.
Cleaning Reigns Supreme:
Use a damp microfiber cloth to remove any dust particles left behind from sanding. Ensure the ceiling surface is clean and free of dust before priming and painting.
Prime Time: Setting the Stage for a Beautiful Finish
A high-quality primer acts as a bonding agent between the drywall and the paint, ensuring a smooth, even application and enhancing the overall durability of the paint job. Here’s what you need to know about priming:
Choosing the Right Primer:
Select a primer specifically formulated for interior drywall applications. For water-based paint (which is recommended for most ceilings), a latex primer is ideal.
Applying the Primer:
Use a paint roller with a nap size suitable for your ceiling texture (typically a short nap roller for smooth ceilings). Apply a thin, even coat of primer, ensuring complete coverage.
Allow for Drying:
Refer to the primer manufacturer’s recommendations for drying time before applying the paint.
Painting Perfection: The Grand Finale
With a smooth, primed ceiling, you’re now ready to apply your chosen paint color and transform your space. Here are some key considerations for the painting stage:
- Selecting the Perfect Paint: Opt for high-quality interior latex paint specifically designed for ceilings. Flat or eggshell finishes are popular choices for ceilings as they offer good coverage and help hide minor imperfections.
- Painting Techniques: For an even, professional-looking finish, use a paint roller with an extension pole to reach the entire ceiling area. For edges and corners, use a quality paintbrush to ensure clean lines.
- Applying Multiple Coats: Two thin coats of paint are generally recommended for optimal coverage and a flawless finish. Allow the first coat to dry completely before applying the second coat.
Conclusion
By following these detailed steps and prioritizing safety throughout the process, you can successfully remove popcorn texture from your ceilings and create a smooth, modern aesthetic in your Allen, TX home. If you’d prefer a stress-free experience and professional results, consider contacting MJ Workforce Solutions – our team of experienced professionals is equipped to handle all aspects of popcorn texture removal efficiently and safely, leaving you with a beautiful, smooth ceiling ready to be painted.