
Essential Tools for Interior Painting Success
On any given weekend in Allen, you’ll find at least one neighbor with paint samples taped to the wall, trying to decide on the perfect color. Yet, according to industry surveys, nearly 60% of DIY interior painting projects end with touch-ups, re-dos, or calling in a pro to fix preventable mistakes. The difference between a smooth, durable finish and a frustrating, patchy result usually isn’t just the paint—it’s the tools and preparation behind it.
For homeowners in Allen, TX, where open floor plans, tall ceilings, and bright natural light are common, every flaw in a paint job is easier to see. Investing in the right tools (and knowing how to use them) saves you time, money, and a lot of stress—whether you’re repainting a bedroom, refreshing trim, or planning a full color change.
You’ll learn which tools matter most, how professionals use them for clean, crisp results, and how they tie into related services like Drywall Repair, Wallpaper Removal, and even specialty finishes.
Key Insight: Interior painting success is 70% preparation, 20% tools, and 10% actual painting. Get those first two right, and the color almost takes care of itself.
1. Surface Preparation Tools: The Hidden Foundation of a Great Paint Job
Every professional painter in Allen will tell you: the job is only as good as the surface underneath. That’s why the most essential “painting” tools often don’t touch paint at all.
Tools that prep your walls for success
For a typical living room repaint, a pro setup might include:
- Putty knives and joint knives (2″, 4″, 6″)
- Sanding sponges and pole sanders (fine and medium grit)
- Dustless sanding attachments or vacuum-compatible sanders
- Utility knife and scoring tools
- Caulk gun and high-quality painter’s caulk
- Cleaning tools (TSP substitute, microfiber cloths, buckets, sponges)
If your walls have nail pops, small holes, or old patch marks, you’re essentially doing light Drywall Patching and Drywall Finishing before you ever open a can of paint.
“Paint is a magnifying glass for bad prep. It doesn’t hide flaws—it highlights them.” — Senior Crew Lead, MJ Workforce Solutions
A real Allen example
In a recent Allen home near Watters Creek, a family wanted to brighten their main level with a soft white. The walls had hairline cracks, past repair areas, and a few settlement issues from the Texas clay soil. Instead of painting over them, our team used:
- Pole sanders with vacuum attachment to control dust
- Flexible caulk and a powered caulk gun to re-seal trim gaps
- Joint knives and setting-type compound for stronger crack repairs
Once the repairs cured and were sanded smooth, the final paint looked flawless—no ghost lines, no flashing, no visible patches in the afternoon sun streaming through the windows.
CALLOUT: High-quality prep tools don’t just improve appearance—they extend the life of your paint job by helping it adhere properly and resist cracking and peeling.
2. Brushes, Rollers, and Sprayers: Choosing the Right Application Tools
Not all brushes and rollers are created equal. Using the wrong ones can leave you with streaks, roller marks, or uneven coverage—especially in bright, open homes common in Allen.
Matching tools to the job
A professional interior setup usually includes:
- Angled sash brushes (2″–2.5″) for cutting in along ceilings, trim, and corners
- High-quality synthetic brushes for water-based paints
- Roller frames with adjustable poles
- Roller covers with different naps:
- 1/4″–3/8″ for smooth walls and cabinets
- 1/2″–3/4″ for lightly textured or older walls
- Mini rollers for doors, trim, and accent walls
- Airless sprayer for large areas or Cabinet Painting and Kitchen Cabinet Staining
For example, if you’re painting over a light orange-peel texture, a 3/8″ nap might not carry enough paint to fill the texture uniformly, leaving a patchy, dull finish. A 1/2″ nap roller creates better coverage and a more even sheen.
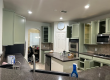
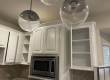
Local case: Cabinets vs. walls in Allen kitchens
We recently worked on a kitchen off Stacy Road where the homeowners wanted a full Cabinet Color Change from dark espresso to a warm white, while repainting the walls a soft greige.
- For the cabinets, we used an airless sprayer with fine-finish tips and high-density foam mini rollers for edges. This gave a smooth, factory-like finish—critical for Cabinet Refinishing or refacing projects.
- For the walls, we used 1/2″ nap rollers on extension poles for efficient coverage and a subtle texture that hides minor wall imperfections.
The homeowners were surprised by how much the right tools affected the final look: the cabinets felt like brand-new factory pieces, and the walls had no lap marks—even under bright LED lighting.
“A $10 brush used correctly beats a $2 brush every time. Cheap tools almost always show up in the final finish.” — MJ Workforce Solutions Project Manager
3. Priming, Sealing, and Problem-Solving Tools
Primer is one of the most misunderstood parts of interior painting. Many homeowners in Allen skip it, then wonder why stains bleed through or colors don’t cover in two coats. The right priming tools and products are non-negotiable when you’re dealing with repairs, stains, or big color changes.
Tools and products that handle problem surfaces
A pro priming kit typically includes:
- High-adhesion bonding primers for glossy or previously oil-painted surfaces
- Stain-blocking primers (shellac or oil-based) for water stains, smoke, or marker
- Tinted primers for strong color changes (dark to light or vice versa)
- Quality roller covers and brushes dedicated to primer
- Spray tips and protective gear for priming larger areas or ceilings
We also use primers heavily in related services like:
- Paint Removal and paint stripping projects
- Popcorn Texture Removal followed by Texture Matching
- Wallpaper Removal and Wallpaper Installation prep
Example: After wallpaper and popcorn removal in Allen
In a home near Allen High School, one project combined multiple challenges: removing 20-year-old wallpaper in the dining room and scraping popcorn off ceilings in the hallway.
We used:
- Scoring tools and steamers for safe wallpaper removal
- Skim-coating tools for smoothing damaged drywall
- Sanding poles and vacuum sanders to level the surface
- High-build primer to seal the repaired areas and create an even surface
Once primed, the walls and ceilings looked like new drywall. Without that priming step (and the tools to apply it correctly), any paint would have soaked in unevenly, flashing over the patches and showing every repair line.
CALLOUT: Primer is your insurance policy. It locks in stains, levels porosity, and gives your topcoat the best chance to perform as advertised.
4. Detail and Finish Tools: Trim, Doors, and Decorative Touches
Once walls are done, the details make the space feel finished. In Allen’s newer neighborhoods, crisp white trim, smooth doors, and carefully chosen accent walls are what take a paint job from “okay” to “wow.”
Tools for clean trim and door finishes
For Trim Painting, door painting, and window frame updates, pros rely on:
- High-quality angled sash brushes (for tight control)
- Painter’s tape designed for delicate surfaces and sharp lines
- Mini rollers and foam rollers for smooth door panels
- Light, flexible caulking tools for re-caulking gaps at trim and baseboards
- Small sanding blocks and pads for scuff-sanding between coats
We use similar precision tools for Faux Painting, decorative finishes, and Accent Wall Painting, where any mistake is highly visible.
“Most people notice the trim and doors first, not the walls. That’s where clean lines and smooth finishes really pay off.” — MJ Workforce Solutions Lead Painter
Local example: Decorative accent wall in an Allen home office
A homeowner working remotely from their Allen home wanted a dramatic accent wall behind their desk—a deep navy with subtle Faux Finishing effect.
We used:
- Laser levels and fine-line tape to mark off a geometric pattern
- Small artist brushes and mini rollers for tight areas
- Soft sponges and specialty tools to create a layered, textured look
- High-precision caulking and sanding tools to perfect the base before starting
The result was a professional, magazine-worthy accent wall that became the backdrop for video calls and client meetings—something nearly impossible with basic DIY tools.
5. Specialty Tools for Cabinets, Floors, and High-Wear Surfaces
Some interior surfaces work harder than others—kitchen cabinets, garage floors, and high-traffic hallways need more than just standard wall paint and basic tools.
Cabinet refinishing tools
For Cabinet Painting, Kitchen Cabinet Staining, and refinishing, we rely on:
- Detail sanders and dust extractors
- HVLP or fine-finish airless sprayers
- Specialty primers that bond to factory finishes
- Tinted lacquers and durable topcoats
- Drying racks and labeling systems to keep doors and drawers organized
These are the tools that turn dated oak cabinets into “like-new” showpieces without full Cabinet Refacing costs.
Floor and concrete coating tools
For Garage Floor Painting, Epoxy Floor Coating, or Concrete Floor Coating, we use:
- Concrete grinders and shot-blasters for proper surface profiling
- Moisture meters to check slab conditions (critical in Texas humidity)
- Spiked shoes and notched squeegees for even coating application
- Decorative chip broadcasting tools for consistent coverage
Quick comparison: Traditional vs. Modern Tools for High-Wear Surfaces
| Surface Type | Traditional DIY Approach | Modern Pro Approach in Allen, TX |
|---|---|---|
| Kitchen Cabinets | Light sanding + wall paint + brush | Mechanical sanding + bonding primer + sprayed enamel/lacquer |
| Garage Floor | Concrete paint + roller | Diamond grinding + Epoxy Floor Coating + topcoat |
| High-Traffic Hallway | One coat wall paint | Spot Drywall Repair + primer + two coats scuff-resistant paint |
| Interior Doors & Trim | Cheap brush + leftover wall paint | Sanding + enamel/urethane + fine-finish tools |
In an Allen home near Twin Creeks, a homeowner tried a DIY garage floor kit that peeled within a year. After grinding the slab and installing a professional epoxy system with the right tools, their floor is still performing beautifully years later—despite hot tires, humidity, and heavy use.
CALLOUT: High-wear surfaces demand specialized tools and systems. Shortcuts here almost always lead to peeling, chipping, or premature failure.
6. Safety, Cleanup, and Exterior-Adjacent Tools That Still Matter Indoors
Even interior painting relies on some of the same tools we use for Exterior House Painting—especially for safety and cleanliness.
Safety and access tools
For two-story foyers, stairwells, and high ceilings in Allen homes, we use:
- Adjustable ladders and ladder levelers
- Scaffold systems for stairways and tall walls
- Extension poles for rollers and sanding tools
- Proper PPE: respirators, safety glasses, gloves, and coveralls
These tools not only protect our crews—they protect your home by reducing accidents, spills, and damage.
Cleanup and protection tools
To leave your home cleaner than we found it, we rely on:
- Heavy-duty drop cloths and plastic sheeting
- Masking tools for floors, windows, and fixtures
- HEPA-filter vacuums for dust control (especially after Popcorn Texture Removal)
- Pressure washing equipment for exterior prep that affects interior work (like doors, thresholds, and trim transitions)
We also use similar protection tools for adjacent services like Deck Staining and Sealing, Fence Painting, and Fence Staining around Allen homes.
What This Means for Homeowners in Allen, TX
Allen’s housing stock is a mix of newer construction and established neighborhoods, with open layouts, tall ceilings, and lots of natural light. That combination is beautiful—but it’s also unforgiving when it comes to paint flaws.
Here’s why the right tools matter so much locally:
- Bright light shows everything. Afternoon sun pouring through large windows will highlight roller marks, poor Drywall Finishing, and uneven sheen. Quality rollers, primers, and sanding tools keep surfaces consistent.
- High ceilings and open spaces demand safe access. Two-story foyers, stairwells, and great rooms require professional ladders and scaffolding to paint safely and effectively.
- Texas climate affects surfaces. Humidity, temperature swings, and foundation movement lead to cracks, nail pops, and caulk failures. Proper prep tools and flexible, high-quality caulks help keep those issues at bay longer.
- Busy lifestyles limit do-overs. Between school runs, commutes to Dallas, and weekend activities, most Allen homeowners don’t have time for painting do-overs caused by cheap tools or rushed prep.
Many of the “wow” results you see in professionally finished homes around Allen aren’t just about color—they’re about the quiet work done with sanders, primers, specialty brushes, and safety gear before the first coat goes on.
Whether you tackle a room yourself or bring in a team like MJ Workforce Solutions, understanding which tools matter (and why) helps you plan better, budget smarter, and set realistic expectations for the final result.
Frequently Asked Questions
Q: Do I really need primer if I’m just repainting with a similar color?
A: Often, yes—especially in Allen homes where walls have been patched, touched up, or exposed to Texas sunlight. Primer helps even out porosity between old paint and new Drywall Repair areas, preventing “flashing” where patches show through. If you’re dealing with stains, smoke, or grease (common in kitchens and bathrooms), a stain-blocking primer is essential. When changing from a dark color to a lighter one, a tinted primer can reduce the number of topcoats you need and improve coverage. Skipping primer might seem like a time saver, but it often leads to extra coats, uneven sheen, or visible repairs.
Q: What tools do I need if I only want to repaint one bedroom?
A: For a standard bedroom in Allen, you’ll want basic but quality tools: an angled sash brush (2″–2.5″), a roller frame, a 3/8″–1/2″ nap roller cover, an extension pole, painter’s tape, a sanding sponge, a putty knife, patching compound, caulk and caulk gun, plus drop cloths and a good primer. If the room has prior Wallpaper Removal or heavy repairs, add a pole sander and dust mask. These tools cover most bedrooms and small projects, giving you clean lines and a smooth finish without investing in pro-grade sprayers or scaffolding.
Q: How are the tools for cabinet painting different from regular wall painting?
A: Cabinet Painting is closer to fine woodworking than wall painting. You’ll need detail sanders, higher-grit sandpaper, degreasers, bonding primers, and sometimes sprayers designed for fine finishes. We also use specialized drying racks, labeling systems, and fine foam rollers or HVLP sprayers to achieve a smooth, factory-like finish. In Allen kitchens, where cabinets are a major design feature, using wall paint and basic rollers usually leads to brush marks, chipping, and poor durability. Professional tools and products designed for Cabinet Refinishing or refacing make a dramatic difference in both look and longevity.
Q: My walls have old texture and repairs. Can tools really make that look better without replacing drywall?
A: In many cases, yes. With the right Drywall Finishing tools—joint knives, sanding poles, texture sprayers, and high-build primers—we can blend and improve older textures significantly. After Popcorn Texture Removal, for example, we often skim coat and sand to create a smoother, more modern look, then use primers to unify the surface. While severely damaged walls may need partial Drywall Installation, many Allen homeowners are surprised by how fresh and updated their walls look after proper prep and texture matching tools are used—without full replacement.
Q: Is it worth investing in an airless sprayer for my own interior projects?
A: For most homeowners in Allen, buying a sprayer just for occasional projects isn’t necessary and can be risky if you’re unfamiliar with setup and masking. Sprayers require more extensive prep, masking, and cleanup, plus they can create overspray issues if not used correctly. They shine for large, empty spaces or when doing cabinets and doors at scale. For a few rooms, quality brushes and rollers are usually enough. If you’re considering multiple projects—like Exterior House Painting, interior walls, and Floor Coating—it might make sense, but factor in the learning curve and potential for mistakes.
Q: How do I protect my floors and furniture during an interior paint job?
A: Use heavy-duty drop cloths for floors (canvas is less slippery than plastic) and plastic sheeting for furniture and fixtures. Pros in Allen also use masking tools to seal off baseboards, window frames, and door hardware quickly. For projects involving sanding, popcorn removal, or Paint Stripping, HEPA vacuums and dust barriers help keep dust from spreading through your home. Good protection tools are just as important as brushes and rollers—they prevent accidental damage to hardwood floors, tile, and furnishings, and they make cleanup much faster.
Q: Are the tools for interior and exterior painting interchangeable?
A: Some are, but not all. Ladders, extension poles, and many brushes work for both interior and Exterior Painting. However, exterior work around decks, fences, and siding often requires pressure washers, different sprayer tips, and more robust scraping and sanding tools. Interior work, on the other hand, demands finer finish tools for trim, doors, and Decorative Painting. In Allen, where many homes have both detailed interiors and outdoor features like Deck Staining and Sealing or Fence Painting, we tailor tools to each surface to get the best results.
Ready to Get Started?
Interior painting can transform the way your Allen home feels—but only if it’s done with the right tools, prep, and attention to detail. Colors are easy to change; fixing roller marks, peeling cabinets, or uneven walls is much harder.
If you’re planning a project soon, this is a great time to act. Cooler months are ideal for interior work in North Texas, and scheduling early helps you secure your preferred timeframe—especially before holidays, family visits, or listing your home for sale. Whether you’re considering a simple bedroom refresh, a full Cabinet Color Change, or coordinated updates with Wallpaper Installation or Wallpaper Removal, MJ Workforce Solutions can handle the tools, prep, and planning for you.
Next steps are simple: gather your ideas, think about your goals and timeline, and reach out for a consultation. We’ll walk your space, recommend the right systems and tools, and provide a clear, detailed proposal—so you know exactly what to expect from start to finish.
About MJ Workforce Solutions
MJ Workforce Solutions is a locally focused painting and finishing company serving homeowners in Allen, TX and surrounding communities. Our team specializes in interior and exterior painting, Cabinet Painting, Drywall Services, and specialty finishes, using professional-grade tools and industry-best practices to deliver consistent, long-lasting results. With years of experience in North Texas homes and a commitment to clean, careful work, we help you transform your spaces with confidence.