
More than 20 billion square feet of drywall are installed in the United States every year, yet a huge percentage of those walls end up with visible seams, nail pops, or cracks within just a few years. The difference between walls that stay smooth and walls that quickly show flaws is rarely about the material itself—it is almost always about the installation technique. When you understand how drywall is cut, fastened, taped, and finished, you start to see why professional installers in places like Allen, Texas, can deliver a flawless surface while DIY efforts sometimes fall short.
Drywall seems deceptively simple: screw the panels to the studs, cover the joints, and paint. In reality, every step from layout and measuring to sanding and final inspection has best practices that dramatically affect the outcome. Panel orientation, screw spacing, joint treatment, and even the timing between coats of mud all influence how your walls will look five or ten years down the road. That is why homeowners and property managers who care about long-term results often turn to specialists such as MJ Workforce Solutions, who know the nuances of drywall installation in real-world Texas homes and businesses.
This comprehensive guide breaks down the techniques that separate a basic drywall job from a professional-grade installation. Whether you are planning a remodel, finishing a garage, or building a new space in Allen, Texas, understanding these methods will help you evaluate workmanship, communicate better with contractors, and make informed decisions about your project.
Understanding Drywall Basics
Before diving into advanced techniques, it helps to understand what drywall actually is and why it behaves the way it does. Drywall, or gypsum board, is a gypsum core sandwiched between heavy paper faces. The core offers fire resistance and stability, while the paper provides a smooth surface for finishing. Different thicknesses and types exist—1/4-inch for curved surfaces, 1/2-inch for most residential walls, and 5/8-inch for ceilings or fire-rated assemblies. Moisture-resistant, mold-resistant, and Type X fire-rated boards are also common, each chosen based on the specific room and code requirements.
In a climate like Allen, Texas, where temperature swings and humidity changes are part of life, the choice of drywall type and thickness matters. Thicker boards resist sagging on ceilings and help reduce sound transfer between rooms. Moisture-resistant boards are wise in bathrooms, laundry rooms, and near exterior doors where condensation or minor leaks can be a concern. Experienced installers, such as those at MJ Workforce Solutions, evaluate the room’s use, local codes, and environmental conditions before selecting the right board.
Another key concept is understanding how drywall interacts with the framing behind it. Stud spacing, lumber quality, and the overall straightness of the framing will influence how flat the finished wall appears. Even the best drywall techniques cannot fully correct a severely warped stud or a poorly framed corner. That is why professionals always start by checking, shimming, or planing the framing to give the drywall a solid, even base. This small investment of time at the beginning pays off dramatically once the joints are taped and the lights reveal every imperfection.
Planning, Layout, and Preparation
Drywall installation begins long before the first panel is lifted into place. Careful planning and layout prevent unnecessary joints, reduce waste, and minimize the risk of cracks. One essential technique is to plan panel orientation strategically. For walls, most pros run drywall horizontally because it reduces the number of joints, ties multiple studs together, and makes taping more efficient. On ceilings, panels are installed perpendicular to the joists to improve structural integrity and reduce sagging.
Accurate measuring and marking are crucial. Installers usually start at a corner and work outward, accounting for window and door openings, electrical boxes, and mechanical penetrations. Instead of cutting every opening precisely on the floor, many pros hang a full sheet over the area and then cut out the openings in place using a rotary tool or drywall saw. This approach can save time and reduce measurement errors, but it requires confidence and a steady hand to avoid damaging wires, pipes, or framing.
Surface preparation is another often-overlooked step. Before any drywall goes up, installers inspect the framing for protruding nails, uneven studs, and misaligned corners. Shimming low studs, trimming high spots, and reinforcing weak corners with blocking all contribute to a more stable installation. In a busy market like Allen, Texas, where many homes are built quickly, these corrections are especially important during remodels. MJ Workforce Solutions frequently encounters framing irregularities in older or rapidly built homes and knows that addressing them before hanging drywall is the only way to achieve long-term stability and a smooth finish.
Hanging Techniques for Strong, Flat Walls
Once planning is complete, the physical act of hanging drywall is where technique truly starts to show. One of the most critical elements is fastener placement. Screws should typically be spaced about 16 inches apart on walls and 12 inches apart on ceilings, with extra fasteners near edges and joints. Screws must be driven just below the surface of the paper without tearing it. Overdriven screws weaken the holding power and can lead to popped fasteners later, especially when the structure flexes or settles.
Panel joints also require careful attention. Staggering vertical joints between rows of drywall helps avoid long continuous seams that are prone to cracking. On ceilings, it is best to avoid small “sliver” pieces and instead use full sheets wherever possible, even if it means cutting around fixtures more creatively. Where two factory edges meet, the tapered design allows for a recessed joint that can accept joint compound without creating a noticeable hump. Butt joints, where two cut ends meet, are trickier because they are not recessed and must be feathered over a wider area to disappear.
Cutting drywall cleanly is another subtle but important skill. Scoring with a utility knife and snapping along the score line is the standard method for straight cuts. For more complex shapes, such as around windows, outlets, and archways, installers combine scoring, saws, and rotary tools. Clean, precise cuts reduce gaps at joints and around openings, which means less joint compound is needed and the final finish is more stable. In professional projects throughout Allen, Texas, MJ Workforce Solutions prioritizes tight, accurate fits to minimize future movement and ensure that seams remain invisible even as the building shifts slightly over time.
Joint Treatment, Taping, and Mudding
Even perfectly hung drywall will look rough until the joints are properly treated. Taping and mudding are where many DIY projects run into trouble because these steps require both the right materials and practiced technique. There are three main types of joint compound: all-purpose, lightweight, and setting-type (often called “hot mud”). Many professionals use setting-type mud for the first coat because it hardens chemically and resists shrinkage, then switch to lighter compounds for subsequent coats to make sanding easier.
Paper tape and fiberglass mesh tape are the two most common options for reinforcing joints. Paper tape, when properly embedded in joint compound, provides excellent strength and crack resistance, especially for butt joints and corners. Mesh tape is self-adhesive and faster to apply, but it generally requires setting-type compound to avoid future cracking. For high-quality residential work in Allen, Texas, paper tape is often preferred for flat joints and inside corners, while mesh tape may be used selectively for repairs or specific problem areas.
The sequence of coats is critical. The first coat fills the joint and embeds the tape, creating a strong bond between panels. Once dry, a second coat widens the joint and begins to feather the edges into the surrounding surface. A third coat, often even wider, refines the surface and eliminates remaining ridges or low spots. Each coat must be allowed to dry completely and then lightly sanded or scraped to remove imperfections before the next is applied. Rushing this process leads to bubbles, cracks, or visible tape lines that become painfully obvious once paint and lighting are added.
Finishing, Sanding, and Surface Quality
With joints taped and coated, the final appearance of the wall depends largely on finishing and sanding techniques. Sanding is not just about smoothing out obvious ridges; it is about gradually blending the joint into the surrounding surface without creating waves or depressions. Using a pole sander with fine-grit paper helps achieve broad, even strokes, while hand sanding sponges are useful for corners and tight areas. Dust control is also a concern, especially in occupied homes, so professionals often use vacuum-sanding systems or meticulous containment to keep the rest of the property clean.
Lighting is a powerful tool during the finishing stage. Raking light—shining a bright light parallel to the wall—reveals imperfections that normal overhead lighting might hide. Professional crews in Allen, Texas, use this technique to spot subtle humps, scratches, or pinholes in the joint compound. Correcting these flaws before priming is essential because primer and paint will not hide defects; they will actually highlight them. This attention to detail is one of the hallmarks of the work delivered by companies like MJ Workforce Solutions.
Another advanced concept is understanding drywall finish levels, which range from Level 0 (no tape or finish) to Level 5 (a full skim coat over the entire surface). In many residential settings, Level 4 (three coats on joints, smooth sanding, and a good primer) is standard and sufficient. However, in areas with critical lighting, glossy paints, or high-end design expectations, a Level 5 finish is often recommended. This involves applying a thin skim coat of joint compound across the entire surface, not just the joints, to create a perfectly uniform texture. While it adds labor, it dramatically improves the appearance under strong light and with certain paint sheens.
Special Situations: Ceilings, Corners, and Repairs
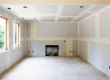
Not all drywall surfaces are created equal. Ceilings, for example, are more prone to sagging and visible seams because they are often viewed from low angles and receive strong natural or artificial light. Using 5/8-inch drywall or specially rated ceiling boards, along with closer screw spacing, helps prevent sagging. Staggering joints and avoiding butt joints in the middle of ceilings whenever possible also reduces the risk of visible lines. In older Allen homes with popcorn ceilings being removed, new drywall or skim coating may be needed to restore a smooth, modern surface.
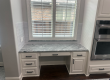
Corners present their own challenges. Inside corners require precise taping and careful use of joint compound to avoid wavy or uneven lines. Many installers use a corner trowel to apply compound evenly on both sides of the corner, then refine with straight knives. Outside corners typically rely on metal, vinyl, or paper-faced metal corner beads for protection and straight lines. These beads are fastened securely and then coated with multiple layers of compound to blend them seamlessly into the adjacent surfaces.
Repairs and patching demand a slightly different technique set. Small holes from anchors or minor damage can be filled and sanded easily, but larger repairs require backing support, such as a piece of wood or a drywall patch panel. The goal is to restore the surface so the repair is undetectable after painting. Matching existing textures is often the hardest part—orange peel, knockdown, and smooth finishes all require different tools and methods. This is where an experienced local pro like MJ Workforce Solutions can be invaluable, especially when tying new work into older surfaces throughout Allen, Texas. For related surface updates, many homeowners also explore services like Wallpaper Installation to coordinate finishes across their interiors.
Frequently Asked Questions
How long does a typical drywall installation take in a standard room? For an average-sized room, professional installers can usually hang the drywall in a day, tape and apply the first coat of joint compound on the second day, and then apply subsequent coats and sanding over the next few days. Drying time between coats is the main factor, especially in humid conditions. In Allen, Texas, where humidity can fluctuate, crews may use fans or dehumidifiers to help compounds cure properly without rushing the process.
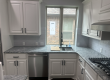
What is the best type of drywall for bathrooms and kitchens? In moisture-prone areas like bathrooms, laundry rooms, and some kitchen zones, moisture-resistant or mold-resistant drywall is recommended. These boards have specially treated cores and facings that better withstand occasional humidity and minor splashes. However, they are not a substitute for proper waterproofing in shower enclosures, where cement board or other tile backer materials are typically required. A professional installer will evaluate each area and suggest the appropriate material based on local building codes and use.
Why do drywall seams sometimes crack after a few years? Cracking seams are usually the result of movement in the building structure combined with inadequate joint treatment. If the tape was not properly embedded, the wrong type of compound was used, or the framing behind the drywall was unstable, cracks can appear over time. Temperature changes and settling are common in North Texas, including Allen, so solid framing, correct taping techniques, and the right choice of compounds are critical to long-term durability.
Is it worth paying extra for a Level 5 drywall finish? A Level 5 finish is most valuable in areas with strong, direct lighting or where very smooth, glossy paint will be applied. In hallways, rooms with large windows, or spaces with accent lighting that grazes the walls, a Level 5 finish helps avoid visible joint lines and subtle waves. For many standard rooms with flat or eggshell paint, a high-quality Level 4 finish is sufficient. A professional like MJ Workforce Solutions can walk you through where the upgrade truly makes a visible difference in your Allen home or business.
Can a skilled DIYer achieve professional-looking drywall results? A dedicated DIYer can certainly achieve good results, especially on small projects, but it often takes practice and patience to match professional-level finishes. The biggest challenges are usually in taping, mudding, and sanding—these skills improve significantly with experience. For large or highly visible areas, or when time and cleanliness are important, many homeowners in Allen, Texas, choose to bring in professionals. This ensures a smooth, durable finish and avoids the frustration of visible seams or extensive sanding dust throughout the home.